
ClearPoint Principal Engineer, Irina Southwell shares our vision of test automation, specifically microservice API testing – one of the most important parts of a continuous delivery (CD) pipeline.
In a continuous delivery environment, we need to test each phase of our build and deployment pipeline as if they are layers that build on each other. Each of these layers can introduce additional integrations and abstractions on top of the previous layer.
We’ve built up a model to describe our approach to the architecture of test automation and how it fits into the development and deployment cycle below. We’ve divided it into three distinct phases – the build phase, integration phase and deployment phase. In this post, we will discuss Service and API tests and how they fit into our development and testing workflow.
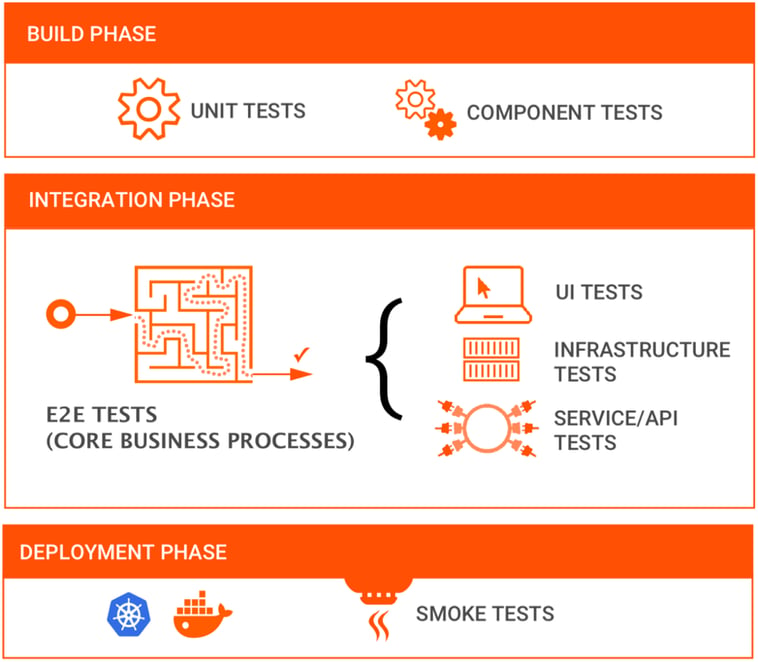
Below, we will run through an example of the Integration Phase’s ‘Service/API Tests’ in the diagram and we’ll look at some examples of how this layer of test automation can be designed. This layer is often used to test an application’s business logic without involving the user interface. We love this approach because by testing outside the UI, we can test the inputs and outputs of our APIs or services without all the complications the UI introduces.
We’ve created a sample test project to demonstrate some of the core techniques that have helped us reduce the development time of automation so that we can build a more reliable and less flaky test suite.
Test Design. BDD, TDD and Cucumber
Following a proper Test-Driven Development (TDD) workflow is often the ultimate goal for many Agile teams but it’s one that’s difficult to achieve. As an application’s complexity increases, it often becomes impossible to enumerate all the test cases needed for the numerous scenarios that might be encountered. We think that using Behaviour-Driven Development (BDD) frameworks like Cucumber help us get closer to true TDD whilst additionally providing other benefits like a source of truth for functional specifications and living documentation that then link directly to their implementations. Having a single place you can go to find all the information about what your system does saves a lot of time that is often wasted trying to keep requirements documents, tests, and code all in sync. It also helps to build trust within a team because different parts of a team no longer have their own personal versions of the truth.
Cucumber feature files use the simple Gherkin syntax which allows every team member to understand exactly what’s being tested. Testers that are used to writing exhaustive, imperative API acceptance tests may at first find the declarative nature encouraged by BDD a bit unusual. If you think about an API as a user story that delivers a certain result based on various input steps then it’s actually not much different from standard business requirements. In fact, Cucumber API test scenarios will often be shorter, more structured and less vague. The point here is that we abstract the imperative implementation to the step definition layer so if that implementation changes, we only need to change the step definitions, not both the steps and feature files.
We’ve added some examples of feature files with API test scenarios in the test sample project. Here’s one basic scenario below:
Scenario Outline: Create a new book
    When I add a book with id <id> and name <name>
    Then I should be able to find this book in the system by id <id>

    Examples:
      | id       | name      |
      | 01234567 | Peter Pan |
This test scenario is checking our API’s “Create new book” functionality, however this functionality actually uses two different individual API methods in order to first set a certain state and then verify the outcome of setting that state. When we get to the step implementation phase – the actual code that ‘does’ the work required to perform our test – our first step will call the “POST book” API and the second step will call the “GET book” API. This means that we’re not only doing individual contract tests but we’re also testing other integration points that those contracts use to perform this behaviour in the application. It also means that if our API implementation changes, as mentioned above, we only need to change the step definitions.
Test implementation with Open API
On a large Java project of ours, when we first started implementing step definitions, we initially looked at some Java libraries like Unirest however we quickly realised that this approach would require repeating ourselves a lot as we’d have to write heaps of support code just to do simple things like creating a client to call our APIs. This meant that future maintenance would become a major bottleneck for writing and maintaining our automated tests. So we decided to use OpenAPI (formerly known as Swagger) and our Connect OpenAPI Jersey2 plugin to generate the client-side code automatically. This was a far more sensible choice, and a huge timesaver. Our developers were already using OpenAPI for their contract-first microservice development so this was a real no-brainer.
From the OpenAPI documentation:
The OpenAPI Specification (OAS) defines a standard, programming language-agnostic interface description for REST APIs, which allows both humans and computers to discover and understand the capabilities of a service without requiring access to source code, additional documentation, or inspection of network traffic.
In other words, any REST API can be described using the Open API standard in a JSON or YAML file. Let’s see how we can use the Connect OpenAPI Jersey2 plugin to automatically generate API methods based on OpenAPI JSON files.
Using an OpenAPI specification to generate client-side code
oas.json. In our connect-java-cucumber project, we have a sample oas.json that describes a ‘Books’ API:
{"swagger": "2.0",
  "info": {
    "version": "",
    "title": "Example",
    "description": "example api"
  },
  "basePath": "/latest",
  "consumes": [
    "application/json"
  ],
  "produces": [
    "application/json"
  ],
  "paths": {
    "/books/{id}": {
      "parameters": [
        {
          "name": "id",
          "in": "path",
          "required": true,
          "type": "string"
        }
      ],
      "get": {
        "operationId": "getBook",
        "summary": "Get Book",
        "tags": [
          "Books"
        ],
        "responses": {
          "200": {
            "description": "",
            "schema": {
              "$ref": "#/definitions/book-input"
            }
          }
        }
      },
    ...

  "definitions": {
    "book-input": {
      "title": "Book Input",
      "type": "object",
      "properties": {
        "id": {
          "type": "string"
        },
        "name": {
          "type": "string"
        }
      },
      "required": [
        "id"
      ]
    },
  ...
  }
}
2. Add the swagger-codegen-maven-plugin and connect-openapi-jersey2 dependencies to your pom.xml file and configure the input and output directories:
<plugin>
   <groupId>io.swagger</groupId>
   <artifactId>swagger-codegen-maven-plugin</artifactId>
   <version>2.2.3</version>
   <dependencies>
  	<dependency>
     	<groupId>cd.connect.openapi</groupId>
     	<artifactId>connect-openapi-jersey2</artifactId>
     	<version>1.2-SNAPSHOT</version>
  	</dependency>
   </dependencies>
   <executions>
  	<execution>
     	<goals>
        	<goal>generate</goal>
     	</goals>
     	<phase>generate-sources</phase>
     	<configuration>
        	<output>${project.basedir}/target/generated-sources/api</output>
        	<apiPackage>cd.connect.example.api</apiPackage>
        	<modelPackage>cd.connect.example.model</modelPackage>
        	<inputSpec>src/main/resources/oas/oas.json</inputSpec>
        	<language>jersey2-api</language>
        	<library>jersey2-api</library>
     	   <configOptions>
           	<dateLibrary>java8</dateLibrary>
        	</configOptions>
     	</configuration>
  	</execution>
   </executions>
</plugin>
3. Let’s also add the build-helper-maven-plugin to ensure generated code is added to the target folder.
<plugin>
   <groupId>org.codehaus.mojo</groupId>
   <artifactId>build-helper-maven-plugin</artifactId>
   <executions>
  	<execution>
     	<id>add-source</id>
     	<phase>generate-sources</phase>
     	<goals>
        	<goal>add-source</goal>
     	</goals>
     	<configuration>
        	<sources>
           	<source>target/generated-sources/api/src/gen/java</source>
        	</sources>
     	</configuration>
  	</execution>
   </executions>
</plugin>
4. From the project directory, run mvn clean compile. You’ll then find the generated client-side code in the target/generated-sources/api/src folder. As we used the connect-openapi-jersey2 client library to generate the code, the BookService class will be created to describe the resource interface using JAX-RS 2.0 annotations:
package cd.connect.example.api;

import cd.connect.example.model.*;

import cd.connect.example.model.BookInput;
import cd.connect.example.model.BookList;

import java.util.List;

import java.io.InputStream;

import org.glassfish.jersey.media.multipart.FormDataContentDisposition;
import org.glassfish.jersey.media.multipart.FormDataParam;

import javax.ws.rs.core.Context;
import javax.ws.rs.core.Response;
import javax.ws.rs.core.SecurityContext;
import javax.ws.rs.*;

@Consumes({ "application/json" })
@Produces({ "application/json" })
@Path("/books")
public interface BooksService  {
  @DELETE
  @Path("/{id}")
  @Consumes({ "application/json" })
  @Produces({ "application/json" })
  public Response deleteBook( @PathParam("id") String id);

  @GET
  @Path("/{id}")
  @Consumes({ "application/json" })
  @Produces({ "application/json" })
  public BookInput getBook( @PathParam("id") String id);

  @GET
  @Consumes({ "application/json" })
  @Produces({ "application/json" })
  public BookList listBooks();

  @POST
  @Consumes({ "application/json" })
  @Produces({ "application/json" })
  public BookInput postBook(BookInput body);

  @PUT
  @Path("/{id}")
  @Consumes({ "application/json" })
  @Produces({ "application/json" })
  public BookInput updateBook( @PathParam("id") String id, BookInput body);

}
In this example, we’ve chosen to use the Connect client library generator and the JAX-RS 2.0 and Jersey implementation because of its ability to dynamically construct a web proxy. This means that an implementation of a given API interface is constructed at run-time. Whilst our examples here are for JAX-RS and Jersey2, there are plugins available for generating client-side code in C#, Clojure, Groovy, Java, NodeJS, TypeScript and many more.
Using generated client-side code in your tests
1. Create a new target pointing to the API endpoint (WebTarget). Then create a new client proxy for the BooksService:
package cd.connect.service;


import cd.connect.example.api.BooksService;
import org.glassfish.jersey.client.ClientConfig;
import org.glassfish.jersey.client.proxy.WebResourceFactory;
import org.glassfish.jersey.filter.LoggingFilter;

import javax.ws.rs.client.Client;
import javax.ws.rs.client.ClientBuilder;
import javax.ws.rs.client.WebTarget;

public class ApiService {


   private Client client = ClientBuilder.newClient();
   private WebTarget webTarget = client.target(System.getProperty("services.api"));

   public BooksService getBooksApi() {
  	return WebResourceFactory.newResource(BooksService.class, webTarget);
   }

}
2. In your step definition file, create an instance of the ApiService and call the getBooksApi methods defined in the BookService interface:
package steps;

import cd.connect.example.model.BookInput;
import cd.connect.example.model.BookList;
import cd.connect.service.ApiService;
import cucumber.api.java.en.Given;
import cucumber.api.java.en.Then;
import org.fest.assertions.api.Assertions;

public class MyStepdefs {
  private ApiService apiService;
  private BookList bookList;

  public MyStepdefs(ApiService apiService) {
    	this.apiService = apiService;
  }

  @Given("^I call get books api$")
  public void callApi() throws Throwable {
    	this.bookList = this.apiService.getBooksApi().listBooks();
  }

@Given("^I add a book with id (.*) and name (.*)$")
public void addABookWithIdAndName(String id, String name) throws Throwable {
  BookInput body = new BookInput();
  body.id(id);
  body.name(name);
  this.apiService.getBooksApi().postBook(body);
}
You can also access response properties, for example to access the ‘book name’ in the assertion:
@Then("^I should be able to find this book in the system by id (.*)$")
public void shouldHaveABookWithId(String id) throws Throwable {
  BookInput book = this.apiService.getBooksApi().getBook(id);
  assertThat(book.name).isNotEmpty();
}
You can also access and check the response status:
@When("^I delete a book with id (.*)$")
public void deleteABookWithId(String id) throws Throwable {
   Response response = apiService.getBooksApi().deleteBook(id);
   assertThat(response.getStatus()).isEqualTo(204);
}
What are the benefits for testing?
- The great thing about using OpenAPI is it is contract first and thus gives you the ability to ‘fail fast’. Any changes in the API such as return values, parameter types or the number of properties in the objects will be caught during compilation and will provide immediate feedback to your team.
- Saves time and effort spent on test development as your API client code is generated automatically. Test automation engineers can instead focus on the actual tests rather than the code that supports those tests.
- As OpenAPI files can be versioned in your repository, everyone in your team is on the same page. API specs therefore become the single source of truth.
You can clone our sample test project connect-java-cucumber to try this out yourself. Please note that the Books API used in the project is a mocked service with hardcoded responses purely for demo purposes.
We’ve barely scratched the surface of test automation here. We will continue to explore a number of other best practices and test automation techniques such as running tests in parallel, using logging to diagnose issues, and test reporting, all as part of a CD pipeline. For further information on automated testing, get in touch here.


